
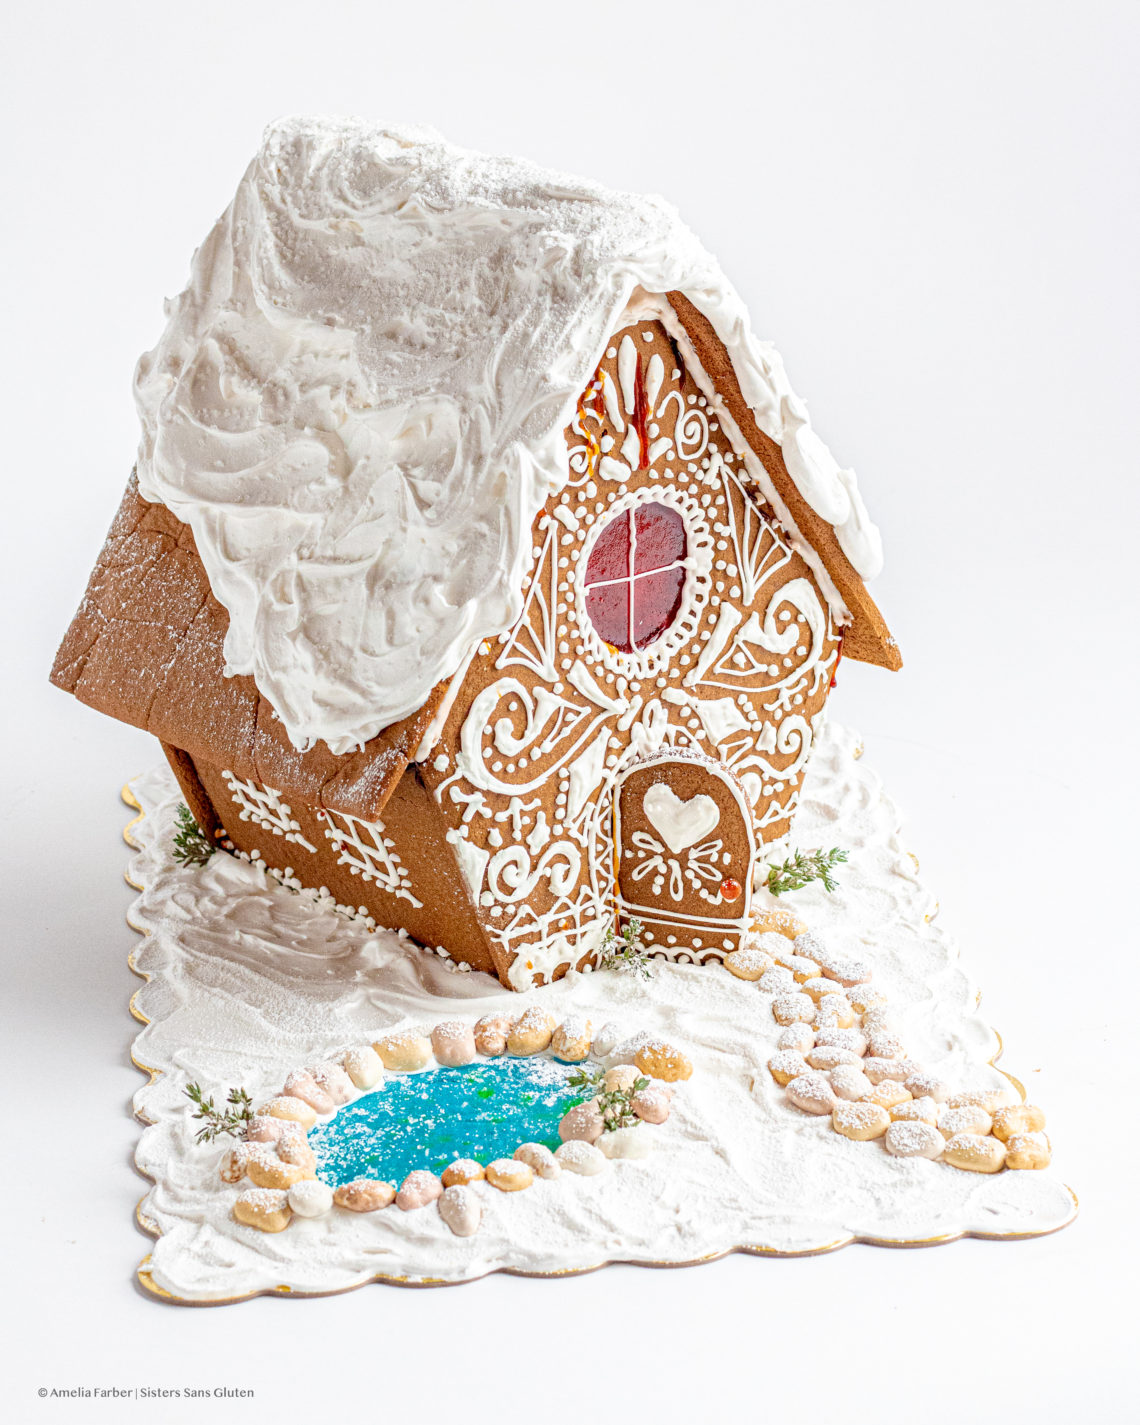
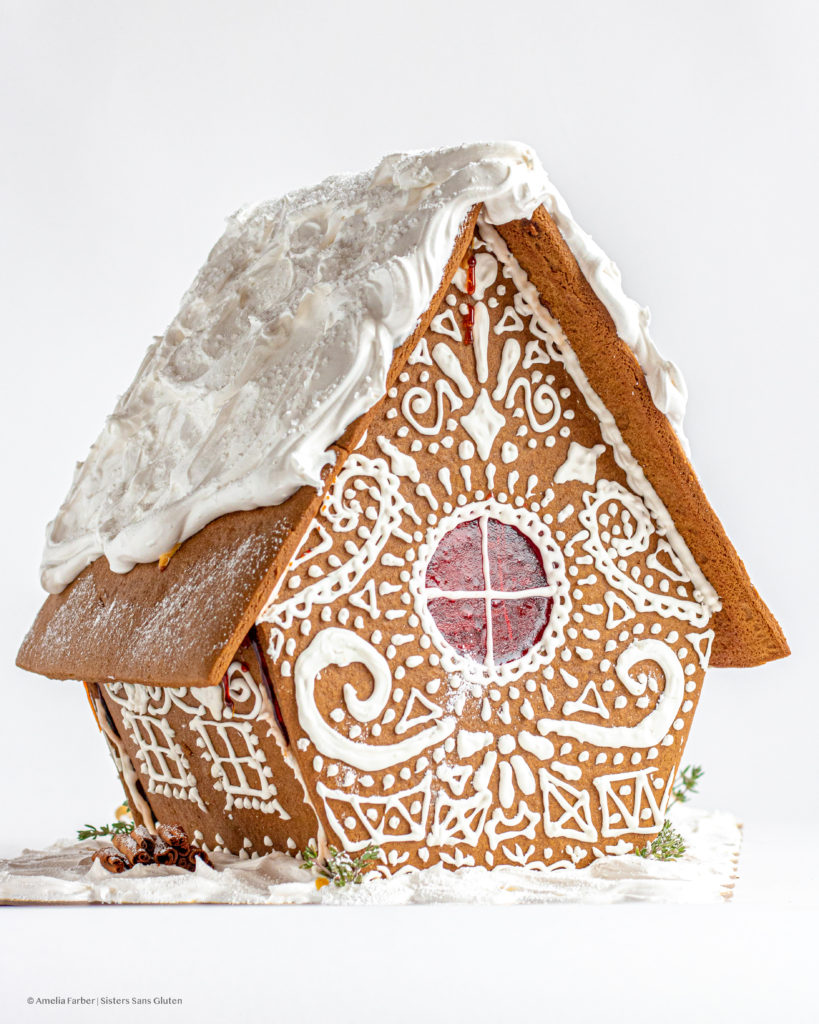
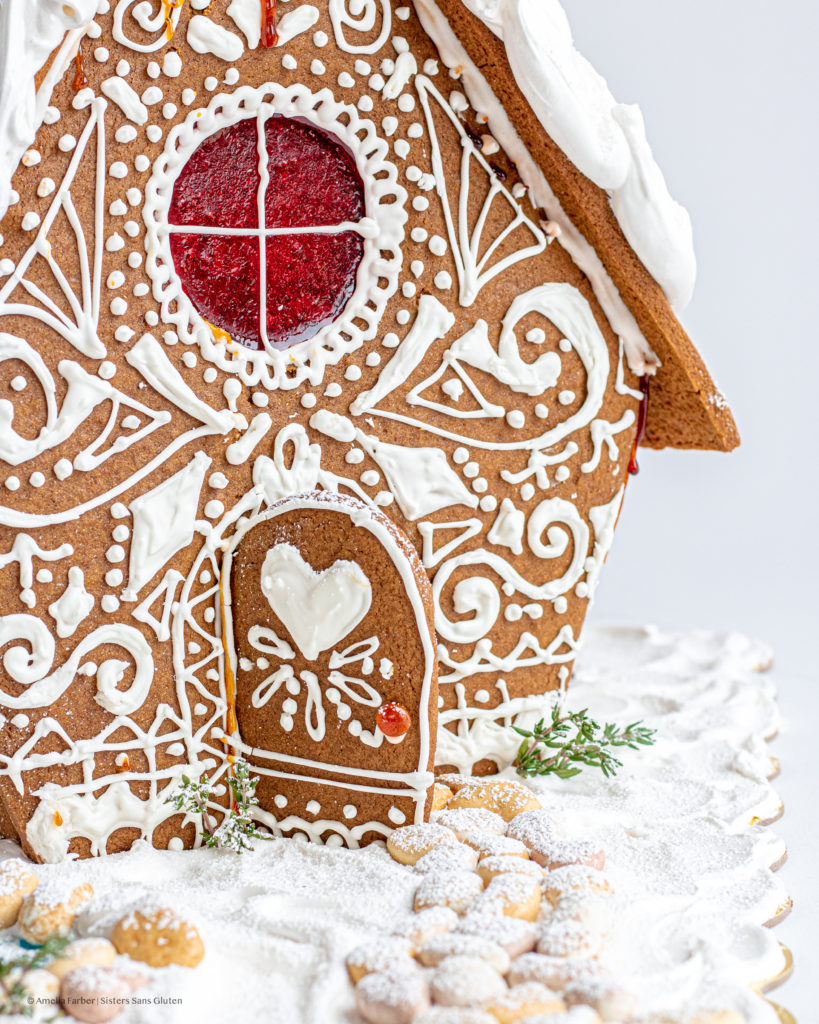
Some of my fondest holiday memories involve taking a hammer to a month-old, stale-as-all-get-out gingerbread house and watching chunks of dry gingerbread, rock-hard gum drops, and royal icing fly in every direction across the kitchen floor. If you’re also reminiscing about the utter destruction of something so beautiful and yet so inedible, this is a post for you. After years (a decade?) hiatus, we decided that we should make a gingerbread house this year. Being older and oh-so wiser, we figured we should construct an epic house, from our own template, with homemade gluten free gingerbread that we carefully piece together with hot caramel instead of the takes-forever-to-set royal icing. A house so cozy and covered in marshmallow fluff snow even the frostiest holiday humbug would go misty-eyed at their first glance. We decided all of this at 2pm on a Sunday. Monday was not a holiday, which meant we had to get our stuff together by a reasonable adult bed time Sunday night. GAME ON.
First, we sketched out a gingerbread house template. After perusing dozens of house designs on Pinterest and Insta, we picked up pencil and rule and paper and jotted down the sizes and shapes of four sides and two roof pieces, and a few extra bits for a chimney (as you notice below, we did not use said chimney, namely because I completely overestimated the size and it turned into a hulking attachment that threatened to cave in our delicate cookie roof, so we nixed that bit). Then we used our mom’s biggest mixing bowl to toss together SEVEN and a half cups of gluten free flour and a bunch of other stuff listed below, and chilled the dough (essential) for two hours. As you can imagine, our time was quickly running out at this point. We finally rolled out the gingerbread dough and carefully cut out every house piece by tracing our template and then froze each tray of pieces before the final bake (also essential unless you want your gingerbread ballooning into an Aunt Marge fun house).
The final steps, detailed below, were the most harrowing. First test: free hand royal icing decorating. You can see the results for yourself here but I think we did a pretty darn good job for the first time decorating with this dangerously-tricky stuff. Second up: the construction. We, as I mentioned above, wanted to use hot caramel to glue the house together instead of more royal icing, which fit our crunched time frame but also presented the challenging task of spreading hot melted sugar on the thin edges of each of the giant house pieces and hurriedly pressing them together. It took a while and the inside of the house looks 100% as if Hansel and Gretel weren’t able to escape the candy-happy witch, but it worked! And then the fun last bits: spreading swooshes of homemade marshmallow fluff over the cake board, on the roof, and Kendra melted and forming her very own front-yard pond from Jolly Ranchers. It was a DAY but a good one!
If you’re looking for other festive, less time-intensive treats, try out our normal, easy-to-make gingerbread cookies here, or this cranberry bundt cake, or these bourbon balls (great to eat while making a gingerbread house), or this caramel apple brandy bundt!

Gluten Free Gingerbread House
Equipment
- Cookie sheets
- Electric mixer
- Plastic wrap
- Waxed paper
- Gingerbread house template (optional)
- Rolling Pin
- Piping bags (optional)
- Small frying pan
Ingredients
For the Gingerbread:
- 1 Cup salted butter room temperature
- 1 1/4 Cup packed brown sugar
- 1 Cup molasses
- 2 large eggs
- 7 1/2 Cups gluten free 1-1 flour mix with xanthan gum in it (if your mix does not contain xanthan gum, add 2 tsp of it now)
- 1/2 tsp baking soda
- 1 Tbsp ground ginger
- 1 Tbsp cinnamon
- 1/2 tsp cloves
- 1/4 tsp allspice
- 1/4 tsp salt
- handfull colored clear hard candies, crushed optional, to make stained glass windows
For the royal icing (for decorating):
- 1/2 Cup pasteurized egg whites
- 4 1/2 – 5 Cups sifted powdered sugar
- food coloring optional
For the caramel "glue" to construct the house:
- 1 Cup white sugar
For the Marshmallow snow (optional):
- 2/3 Cups water
- 1 1/2 Cups white sugar
- 1 1/2 Cups light corn syrup
- 1 tsp cream of tartar
- 6 large egg whites room temperature
For final decorating:
- Powdered sugar optional
- Candies optional
Instructions
To make the gingerbread:
- In a large bowl, using an electric mixer, cream the butter and packed brown sugar until smooth. Add the eggs and molasses and beat to combine. Add in the spices, salt and baking powder and beat until smooth. Using a strong wooden spoon, begin stirring in the flour, one cup at a time. It will get stiff and difficult to stir in the last two cups, but keep working it together! It should not be sticky, and should mold easily into a ball and hold its shape. Split the dough in two parts, pat into a large ball, and wrap both in plastic wrap and chill in the fridge for at least two hours.
- Once the dough is chilled, preheat the oven to 350° and line two cookie sheets with parchment paper and grease lightly with cooking spray. Roll one dough ball out at a time to 1cm (a little more than 1/4 inch) thickness between two sheets of wax paper and use your choice of gingerbread house template to cut out the sides/roof/front/back/pieces for the house. Place pieces 1/2 inch apart on the cookies sheets, and then freeze pieces on sheets for 15 minutes before baking. This will keep the pieces from spreading/changing size.
- Once frozen, bake for 14-18 minutes or until firm on the edges and dry to the touch. Let cool completely before decorating. If you won't be eating the gingerbread house, baking a few minutes longer won't hurt.
- If you're making stained glass windows, remove the sides with windows 5 minutes before the end of the baking time, and spoon in the crushed hard candies so they fill the cut out window area, then put back into the oven for the remaining 5 minutes to melt.
To make the decorating icing:
- In a medium bowl, using an electric mixer, beat the pasteurized egg whites until foamy. Add in 1 cup of powdered sugar at a time, continuing to beat until thick and smooth. You're looking for a thick consistency, not runny, that you can pipe onto cookies. If you want to, scoop 1/2 cup of the icing into small bowls and mix with food coloring before scooping each color into clean piping bags. Snip off a tiny tip of each piping back before decorating house pieces. Decorate how you like before constructing the house, and let icing harden before constructing.
To make the caramel to construct the house:
- Pour white sugar into a small frying pan and heat over medium, stirring frequently, until the sugar begins to melt. Turn down heat once the sugar has melted completely and begins to turn golden. Don't let the sugar get darker than amber or it will have burned and taste terrible (not an issue if you won't be eating the house). Once it's golden, get a helper to hold each piece of the gingerbread house and dip each edge of each piece into the caramel and quickly stick the pieces together – it will harden nearly immediately so construction will need to happen quickly.
To make the marshmallow snow:
- After you've constructed the house, make the marshmallow snow fluff. In a small saucepan, combine the water, corn syrup and sugar over medium heat. Stir occasionally until all of the sugar dissolves, and then stop stirring immediately and let simmer (turn down to med-low heat). Insert your candy thermometer to check temp – this will take 5-10 minutes. Let the mixture simmer (do NOT stir it) until it reaches 240 degrees Fahrenheit (softball stage). While the mixture is cooking, make the meringue.
- In a large, perfectly clean, dry bowl, begin beating your room temp egg whites with your electric mixer. If there is any oil or crumbs in the bowl, the egg whites will not get stiff, so make sure all implements are clean and dry. Beat egg whites until foamy and then add in the cream of tartar and continue to beat until soft peaks form. Let sit until your sugar mixture has reached softball stage.
- Once the sugar syrup is at 240 degrees, immediately turn off heat, and, using heat pads (or a friend to help!), start beating egg whites again and slowly pour in the hot sugar mixture into the egg whites. Beat constantly until all of the sugar mixture has been added (pour in a slow stream, do not dump it in). Do not stop beating the egg whites! Continue to beat after all the sugar syrup has been added, until the bowl is slightly cooler but not room temperature (it will be very hot after adding the syrup). You want the marshmallow spreadable to create the snow. Use a knife to spread the marshmallow on the gingerbread house roof or on the presentation tray.
- Add any final touches, like powdered sugar to look like a light dusting of snow, additional candies, etc.
Tag @sisterssansgluten on Instagram if you snap a photo of your house!
Food photography and styling by Amelia Farber


2 Comments
T. Lynn Farber
Absolutely beautiful! This is the most amazing gingerbread house I have ever seen bar none.
Aria
Amazing creation! This recipe works perfectly for gingerbread houses!