

Over thirty fires have cropped up across California in the past five days, due to late summer heat waves, high winds, and unexpected lightning and thunder storms. Situated in down-town San Francisco, we’re usually safely far from the path of any wildfires, and only have to worry about smoke-tinged air cloaking the peninsula, blown across the state. But this time they’re even closer to home. There’s a strange cognitive dissonance when fire season starts – while admiring the nectarine-orange sunrises and movie-filter sunsets we’re worried about friends and family around the state and wary of the flash-fire devastation that tore so many from their homes in years past. If our world wasn’t already crowded with other strangely apocalyptic signs, August has brought yet another. Remember to check in with friends and family who may be in the path of fires – do they have an evacuation plan? – and those who are especially susceptible to smoky climates. The irony is that we’re all so used to wearing masks every day in California, we’re oddly prepared for at least the change in air quality.
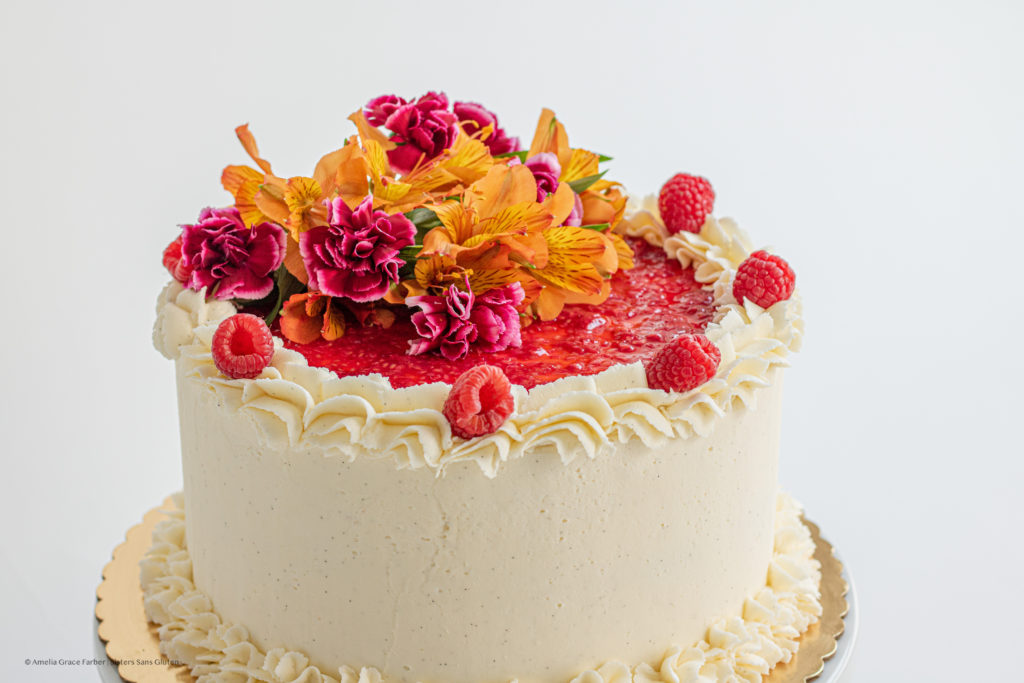
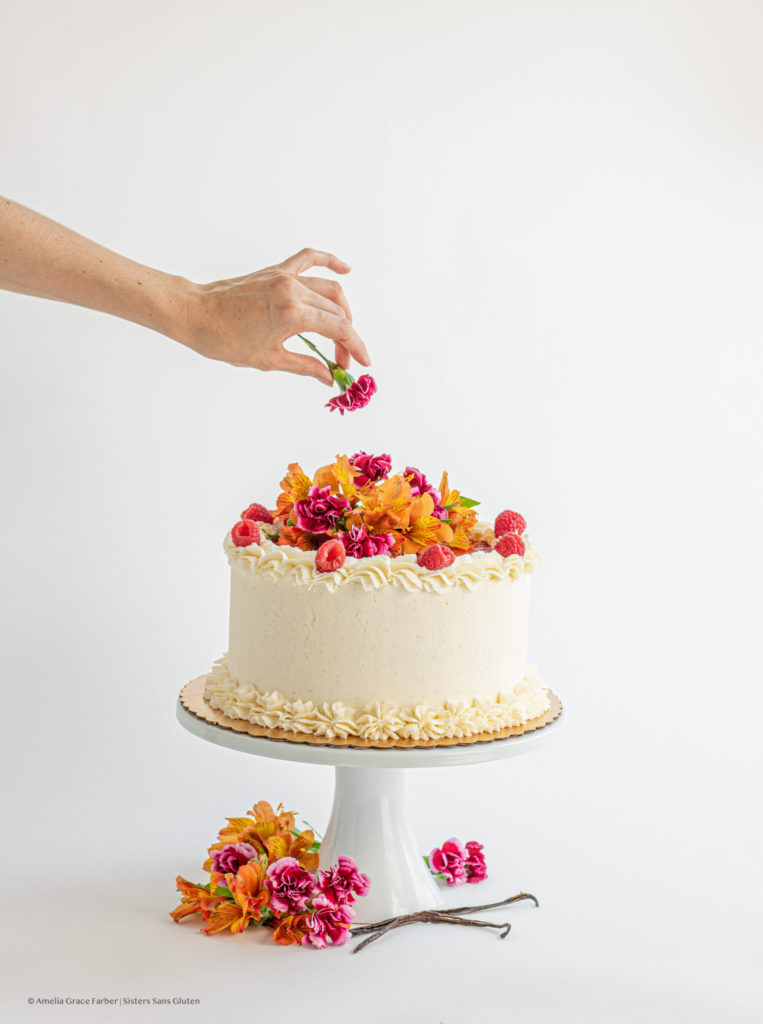
While watching the light change from yellow to hazy orange throughout the day, I couldn’t help but notice that the flowers I just got yesterday to decorate this cake mimicked the the sun’s eery glow, and so this summery, light gluten free raspberry and vanilla bean layer cake has been unofficially dubbed the “Fire Cake.” Yet another take on comfort food keeping us sane while living through the shifting trials of 2020. On a lighter note, this cake was such a joy to make. It is a bit of heavy-hitter (vanilla beans don’t come cheap), it’s a treat-yourself (or someone you love) cake and well-worth making if you’re needing a project to distract you. The cake itself is studded with fresh raspberries, and in between each layer you get heaps of raspberry buttercream, vanilla bean whipped cream, and this signature vanilla buttercream (we used bourbon-preserved vanilla beans and the flavor is AWESOME). Unfortunately, we couldn’t cut into it for the photo shoot because it’s was a special birthday cake order! So you’ll just have to make it yourself to see the gorgeous layering inside.
If this sounds and looks daunting: never fear! It’s basically just a few smaller baking projects wrapped into one big one – just take it one step at a time and you’ll be fine. Also, watching a few simple cake decorating tutorials on youtube never hurts! It’s especially helpful to see how to use a leveler (or just use a bit of cardboard wrapped in saran wrap or tin foil) to smooth the sides and top of the cake. In any case – it’ll taste good! If you’re looking for other birthday-cake projects, check out our pistachio raspberry rose layer cake, or this giant carrot almond cake, or a classic: dark chocolate cherry layer cake. Or, go simple with these funfetti cupcakes!

Gluten Free Raspberry Vanilla Bean Layer Cake
Equipment
- 9-inch round cake pans
- Electric mixer
- Pastry bags
- Cake leveler – optional
Ingredients
For the cakes:
- 2 1/4 Cup gluten free 1-1 flour mix with xanthan gum in it (if your mix does not contain xanthan gum, add 1 tsp of it now)
- 1 1/2 Cup blanched almond flour
- 2 1/4 tsp baking powder
- 1 1/2 tsp baking soda
- 3/4 tsp salt
- 4 large eggs plus 1 egg white
- 1 Cup plus 2 Tbsp canola oil
- 1 Cup plus 2 Tbsp sour cream
- 1 1/2 Cup white sugar
- 4 tsp vanilla extract
- 1/2 Cup milk
- 1 1/2 Cup fresh raspberries – torn into pieces
For the raspberry buttercream:
- 1 Cup salted butter room temperature
- 2-3 Cups sifted powdered sugar
- 1/4 Cup sifted powdered freeze dried raspberries instructions below
- 1/2 tsp lemon juice
- 1 tsp vanilla extract
For the vanilla bean whipped cream:
- 1 Cup heavy cream
- 2 Tbsp sifted powdered sugar
- the seeds from 1/2 a vanilla bean pod instructions below
For the vanilla bean buttercream:
- 4 Cups salted butter room temperature
- 6-7 Cups sifted powdered sugar
- 1 tsp vanilla extract
- the seeds from 1 whole vanilla bean pod instructions below
- 1 tbsp cream
For decorating:
- 1 Cup fresh raspberries
Instructions
- First, make your cakes! Preheat oven to 350° Fahrenheit and grease three 9-inch round cake pans with cooking spray or butter, then set aside. In a medium bowl, whisk together the flour, almond flour, baking powder, baking soda, and salt until combined. Then, in a large bowl, whisk together the eggs, oil, sour cream, sugar, vanilla, and milk until smooth. Add the dry ingredients into the wet and whisk to combine. Add in the torn raspberries (I choose not to chop the raspberries so that their juice doesn't bleed into the cakes) and stir with a spatula to combine. Pour the batter evenly into the three pans, and bake for 33-38 minutes or until a skewer inserted into the center of the cakes comes out clean. Let cakes cool completely, and then use a sharp, long knife to carefully slice off the rounded tops of each cake so that they are flat – eat or discard the tops!
- While the cakes are cooling, make the two buttercreams and whipped cream. First, the raspberry buttercream. In a medium bowl, using an electric mixer, beat the butter on high for 1-2 minutes. Add in the powdered sugar, lemon juice and vanilla and beat again to combine. Use a nutribullet or food processor to blitz up a bag of freeze dried raspberries until they're a find powder. Sift the raspberry powder to remove seeds and add powder to the buttercream. Beat until smooth and fully combined. Set aside.
- Then, make the vanilla bean whipped cream. In another medium bowl, beat the heavy cream until soft peaks form. Add the vanilla extract and powdered sugar and beat to combine. Finally, take one of your vanilla beans and slit it long-ways with a small knife. Peel open the pod and scrape out the seeds from one half of the pod and add seeds to your cream. Beat until combined, then set aside.
- Finally, make your vanilla bean buttercream. In a large bowl, using an electric mixer, beat the room temp butter on high for at least 5 minutes. This may seem like a long time, but the butter will change color and get whiter the longer you beat it, giving you a much whiter buttercream to decorate your cake with. After five minutes of beating, add one cup of powdered sugar at a time, beating in between each add until smooth. Once all the powdered sugar has been added, add your vanilla extract and scrape the seeds from one whole vanilla pod into the buttercream and beat to combine. If the buttercream is too stiff, add a tablespoon of cream. Beat to combine, then set aside.
- Now, assemble your cake. Place one cake layer onto a cake board or a serving plate. Scoop some of the vanilla bean buttercream into a pastry bag and pipe the buttercream in a circle as an edge around the top of the cake layer. Spread a thin layer of vanilla buttercream over the layer, then spread about a 1/4 of an inch of the raspberry buttercream on top, staying within the barrier you piped around the edge. Finally, top that with 1/2 cup of the whipped cream, then place a second cake layer on top and repeat this step on that layer.
- Finally, place the final cake layer on top, and crumb coat the entire cake – top and sides – with the vanilla bean buttercream. Freeze the entire cake for 1 hour to set the crumb coating, then remove, and finish frosting the cake with the vanilla bean buttercream. I use a cake leveler to ensure sides and top are smooth and straight. Mash 1/2 cup of the remaining fresh raspberries and spread the berries over the top of the cake, then use the last of the vanilla bean buttercream to decorate the top and bottom edge of the cake. Place the last fresh raspberries on the top edge of the cake and then serve.
Tag @sisterssansgluten on Instagram if you snap a photo of your cake!
Food photography and styling by Amelia Farber


One Comment
Pingback: