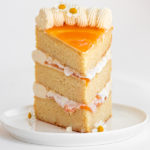
Gluten Free Browned Butter Apricot and Vanilla Bean Cake
This decadent, not-too-sweet browned butter cake is layered with apricot preserves, whipped cream, and vanilla bean ermine buttercream
Servings: 14 people
Calories: 550kcal
Equipment
- Three 9-inch round cake pans
- Three cake pan strips
- Large saucepan
- Cookie sheet
- Parchment paper
- Electric mixer
- Piping bags and tips
Ingredients
For the cake layers:
- 1 ½ Cups browned Isigny unsalted butter start with 1 ⅔ cup unsalted Isigny butter, instructions below
- 1 ½ Cups white sugar
- 9 large egg whites
- 1 Tbsp vanilla extract
- ¾ Cup sour cream
- 1 ¾ + 2 Tbsp whole milk
- 2 ¼ Cups gluten free 1-1 flour mix with xanthan gum added if it doesn't have xanthan gum, add 1 teaspoon xanthan gum
- ¾ Cup packed blanched almond flour
- ¼ Cup + 2 Tbsp sweet rice flour
- ¼ Cup + 2 Tbsp arrowroot starch
- 3 ¾ tsp baking powder
- 1 ½ tsp baking soda
- 1 ⅛ tsp salt
For the vanilla bean ermine buttercream:
- 1 ¾ Cup white sugar
- ¾ Cup gluten free 1-1 flour mix with xanthan gum added if it doesn't have xanthan gum, add 1 teaspoon xanthan gum
- ¼ Cup sweet rice flour
- 1 Tbsp cornstarch
- ½ tsp salt
- 2 Cups whole milk
- 2 Cups (454 grams) Isigny unsalted butter
- Seeds of one whole vanilla bean
- ½ tsp vanilla extract
For the filing + topping:
- ¾ Cup good-quality apricot jam or preserves
- ¾ Cup heavy cream
- 1 Tbsp powdered sugar
- ¼ tsp vanilla extract
Instructions
To make the cake layers:
- First, make your browned Isigny butter! In a medium to large saucepan over medium-low heat, melt the 3/4 cup of Isigny unsalted butter and stir constantly until melted and simmering. Continue to simmer, on medium heat, for at least a few minutes, until the popping and hissing sounds have completely subsided (this is the water in the butter burning off – you’ll know once it’s silent). Continue to cook, stirring constantly, until the butter reaches a deep amber color and smells nutty or caramelly. The butter may foam, so keep stirring/lifting up spoonfuls of the butter to see the color. The browned milk solids will foam up in the center of the pan – once it does that- immediately take off the burner and let sit for a few minutes, then pour (scrape ALL of the brown bits – that's the flavor!) into a heat-proof small bowl and let it cool to room temp (it should be solid) - you can speed up the cooling process by popping the butter into the fridge fr 15 minutes but don’t leave it there or it will be too hard for the cake layers.
- Once the browned butter is room temp + solid, make your cake layers. Preheat the oven to 350 degrees Fahrenheit, and grease three 9-inch round cake pans with cooking spray or butter. Separately, start soaking your three cake pan strips in a bowl of water (using cake pan strips is optional but will give you moister, level cakes).
- In a large mixing bowl, using an electric mixer, cream the 1 ½ cups of browned Isigny butter with the 1 ½ Cups of white sugar until lighter and fluffy - about 2-3 minutes. While still beating, add the egg whites one at a time, beating to incorporate in between each addition. Once all 9 egg whites have been added, add the vanilla, sour cream, and milk, and beat to combine. Finally, using a whisk or silicone spatula, stir in the gluten free 1-1 flour, almond flour, sweet rice flour, arrowroot starch, baking soda, baking powder, and salt until fully combined.
- If using cake pan strips, remove from the water bowl now and fasten each one to your cake pans. Then scoop the cake batter evenly into each pan - you can use a measuring cup to ensure each pan receives the same amount of batter for even layers. Bake for 30-35 minutes or until a skewer inserted into the center of a cake comes out clean. Remove cakes from the oven and let cool completely before turning out. Once the cakes are cool, I recommend turning them out, wrapping them in two layers of plastic wrap, returning them to the pans, and freezing all three cakes for at least two hours (this will make constructing the cake much easier).
To make the ermine buttercream:
- Once your cakes are in the freezer, make your ermine buttercream. First, line a rimmed baking sheet (I use a cookie sheet) with parchment paper and set aside. Then, in a large saucepan, whisk together your 1 ¾ Cups white sugar, ¾ Cups of gluten free 1-1 flour, ¼ Cup of sweet rice flour, 1 Tbsp of cornstarch, and ½ tsp salt until combined, then turn on heat to medium and whisk constantly for 3-4 minutes as the flour toasts (it will start to smell a bit nutty). Then, still whisking constantly, add in your whole milk and continue to whisk for 3-5 minutes as the mixture slowly thickens. Near the end, it will thicken very quickly into a pudding-like texture, so keep whisking! Once it’s the consistency of a thick/set pudding or pastry cream, remove from the heat and pour all of the mixture into the prepared baking sheet, using a spatula to spread evenly across the pan. Freeze this for 15 minutes or until the mixture is room temp/cool to the touch but not frozen.
- Once the pudding mixture is cool, you can make the buttercream! In a large mixing bowl, using an electric mixer, beat the 2 cups of Isigny unsalted butter until lighter and fluffy (4-5 minutes to get very-white butter). Then, still beating, add 1 Tbsp of the cooled pudding mixture at a time, beating to incorporate in between each addition (it will look like it isn’t mixing in well, just keep beating it!). Once ALL of the pudding mixture has been added (this is a fairly long process), stop beating and use a sharp knife to slice open your vanilla bean lengthwise. Scrape all of the tiny vanilla seeds out and add them to your buttercream. Finally, add the extra vanilla extract and beat the buttercream until smooth. Scoop a couple of cups of the buttercream into a piping bag with your choice of piping tip.
- To make the fillings/topping:
- Before constructing the cake, make whipped cream. In a medium bowl using a whisk or an electric mixer, beat the ¾ Cup of heavy cream until soft peaks form, then add the powdered sugar and vanilla and continue to beat until stiff peaks form.
To construct the cake:
- Unwrap your frozen cake layers and place one on a cake tray/board/or plate. Using a palette knife or butter knife, spread a thin layer of the ermine buttercream on the layer, leaving an inch around the edge of the cake empty. Then spread ¼ cup of apricot jam on top of the buttercream layer. Then pipe a ring of ermine around the empty edge of the cake to form the structure for the filling layer. Fill the remaining space inside the ring with some of the whipped cream, then place the second cake layer on top of the completed filling layer. Repeat until you have placed the third and final cake on top. Decorate the top of the cake however you like - I recommend frosting with a thin layer of ermine, topping that with strained apricot jam, and more piped ermine buttercream around the edge. Then slice and serve!
- To slice the cake easily, use a heated knife - either dip a long sharp knife in hot water (and wipe it dry), or heat it briefly over an open flame (lighter or a stovetop).
- Keep the cake refrigerated until an hour before serving.